01. Installing Unity
Installing Unityhub
Unity installation is fairly straightforward for Windows, Linux and macOS. First you need to install the Unity Hub which is a sort of Meta-Software that helps when using different Unity Editor versions (and it helps Unity to monitor your usage of their Engine). Go to Download Unity to install the Unity Hub.
If you are on Linux you need to:
- Open your Terminal (typically Ctrl+Alt+T
- Go to the directory where the downloaded UnityHub.AppImage is (e.g. with
cd ~/Downloads) - Make the downloaded Appimage executable with
chmod +x UnityHub.AppImage - Now you can doubleclick the AppImage in your Filemanager or start it from Terminal via
./UnityHub.AppImage
Setup a Unity Developer Network Account
Unity Hub will ask you to sign in with an account, if you don't already have one you will need to register, and verify your account (they will send you an email).
Install Unity Editor
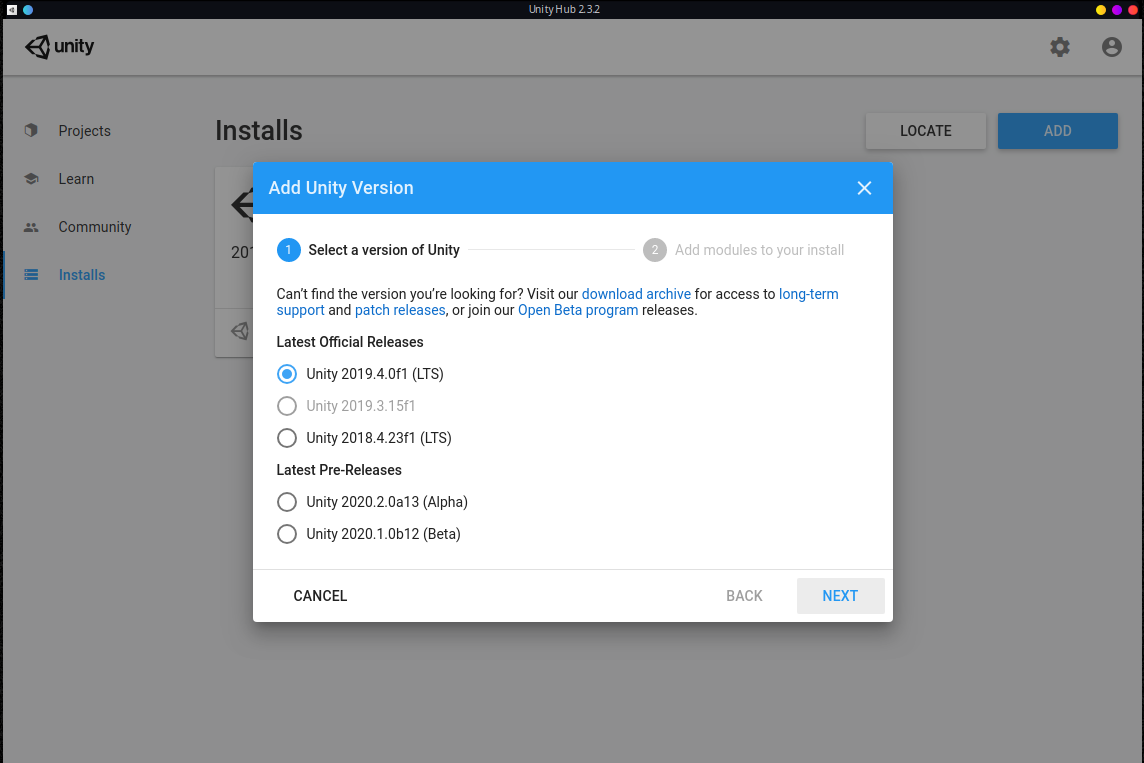
Once you went through all these hoops, you can actually install the Unity Editor going to the Installs sections and clicking onto the blue Add button. There you need to select the right version. Just take the latest Version with LTS (Long Term Support):
The default install locations of the editor are:
| OS | Path |
|---|---|
| Linux | ~/Unity/Hub/Editor |
| Windows | C:\Program Files\Unity\Hub\Editor |
| macOS | /Applications/Unity/Hub/Editor |
Now you need to select the Modules you want to install. This depends a bit what your target is, but you can add these modules later on as well. It makes sense to at least select:
- WebGL Build Support
- Build Support for the Operating System you are currently using (e.g. Linux, Windows, macOS)
For more details regarding the Installation you can read more in the official Unity documentation
02. Navigation
Scene View
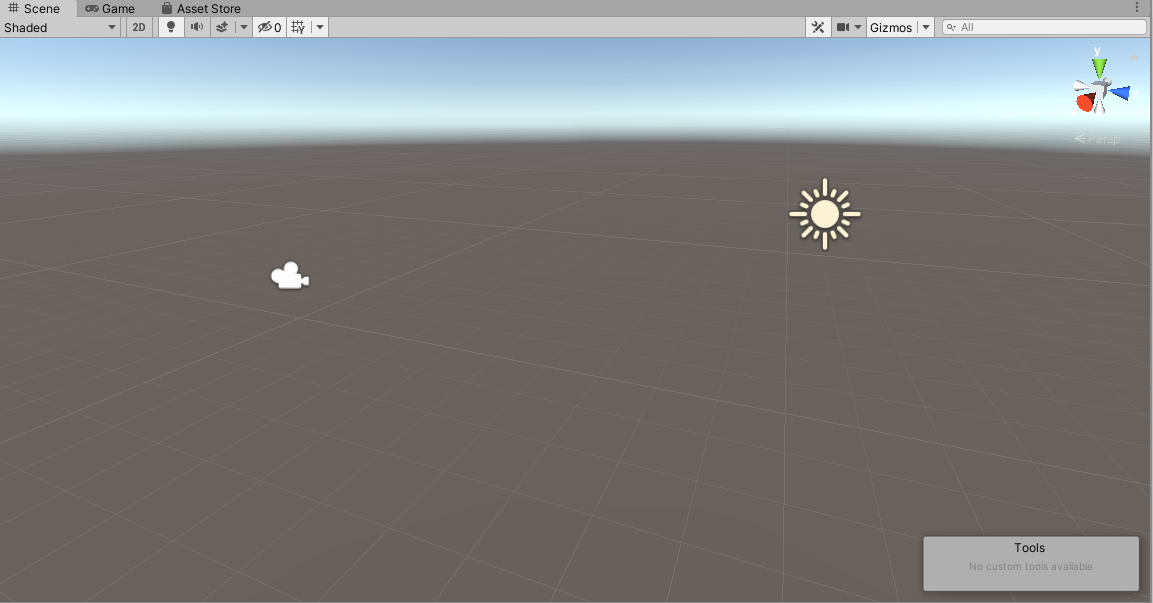
A editor in which you can design your scene.
Per default you have a camera called Main Camera, a Sun called Directional Light in the Scene.
You can navigate with:
- the Gizmo in the upper-right corner (the colorful thing)
- keep RMB clicked and use your mouse and W/A/S/D to fly around (Scroll to change speed)
- or use the Movement Shortcuts below:
| Action | 3-Button Mouse | 2-button mouse or track-pad | Mac with only one mouse button or track-pad |
|---|---|---|---|
| Move | Alt+MMB | Ctrl+Alt+LMB | Alt+⌘+LMB |
| Orbit (only 3D mode) | Alt+LMB | Alt+LMB | Alt+LMB |
| Zoom | Scroll or Alt+RMB | Alt+RMB | Alt+Ctrl+LMB or two-finger swipe |
Game View
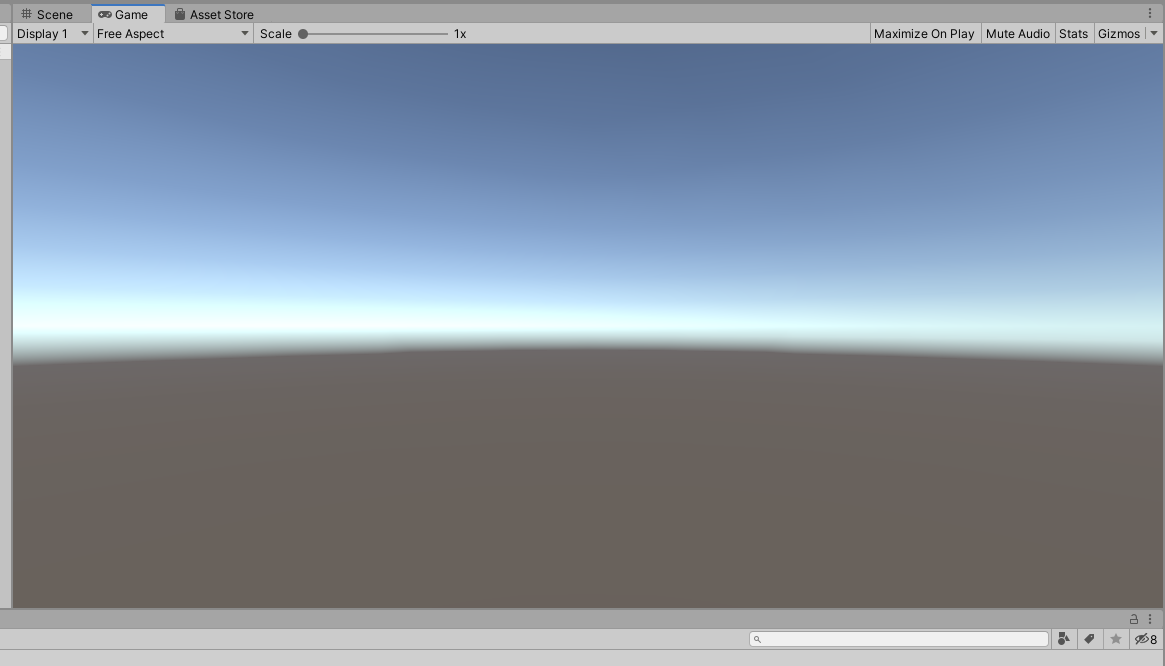
A Preview of the resulting Game. Note the "Maximize on Play"-Toggle on top
Asset Store
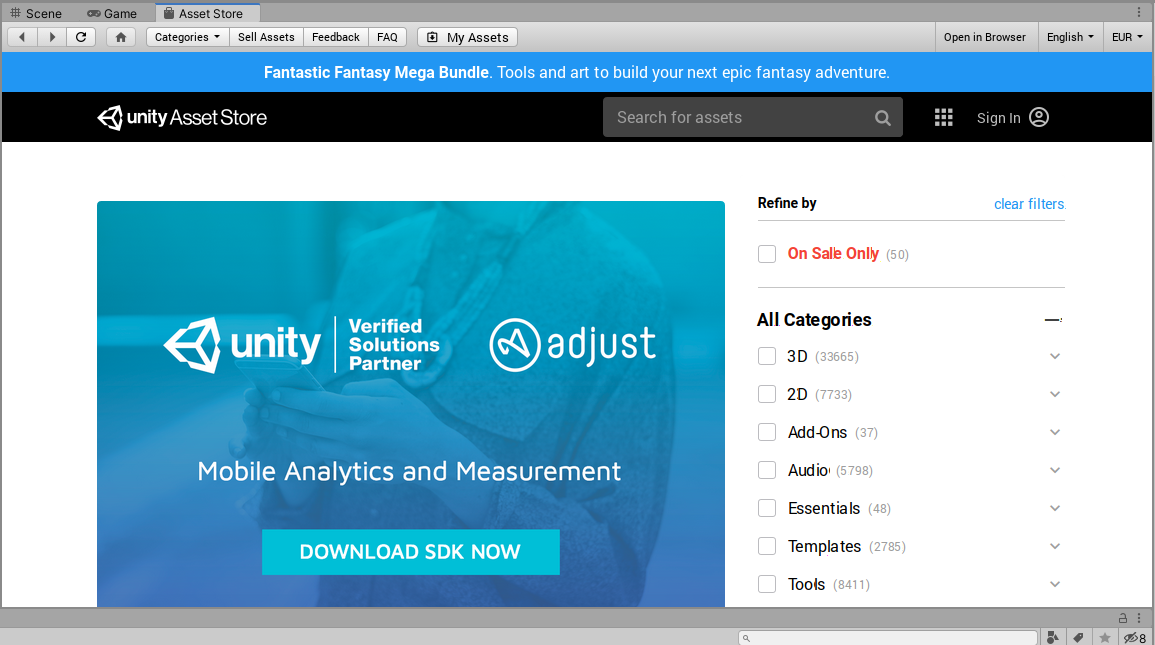
Get/Buy Ressources for your Game
Tools
The toolbar is located in the upper left area of the Window and looks like this: 
| Icon | Name | What it does |
|---|---|---|
 |
Hand Tool | Pan around in the Scene |
 |
Move Tool | Change the Position of individual GameObjects (in XYZ Direction) |
 |
Rotate Tool | Change the Rotation of individual GameObjects (in XYZ Direction) |
 |
Scale Tool | Change the Scaling of individual GameObjects – from its Center or Pivot Point |
 |
Rect Transform Tool | Change the Scaling of individual GameObjects – from its Corners |
 |
Transform Tool | A combination of the Move, Rotate and Scale-Tools |
There can be more Tools depending on the selected Object.
Hierarchy/Outliner
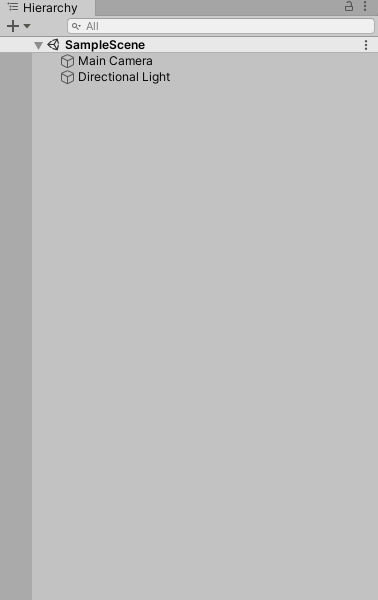
- Lists all objects contained in the Scene
- Create objects with Rightclick
- Display relationships
- Search for objects by name
Inspector
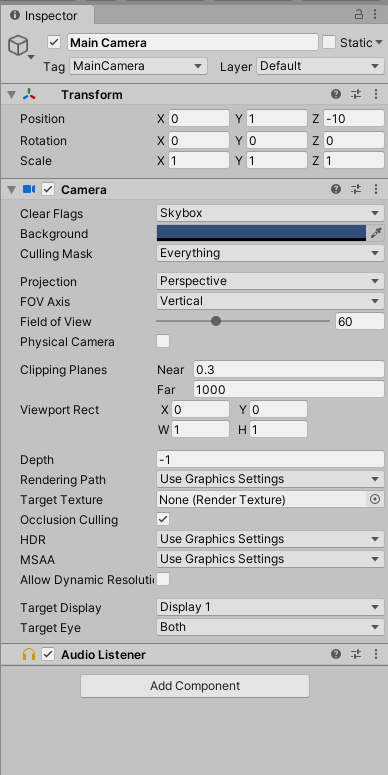
Lists all Components of the currently selected object. You can e.g.:
- Accurately change values like Position, Rotation and Scale in an objects
Transform-Component - Apply new Materials in an objects
MeshRenderer-Component - Deactivate components
- Add new Components and Scripts to influence how objects behave
- Add Tags to group objects together (important for scripting)
- Add Objects to a certain Layer to avoid them having effect on certain things
Project
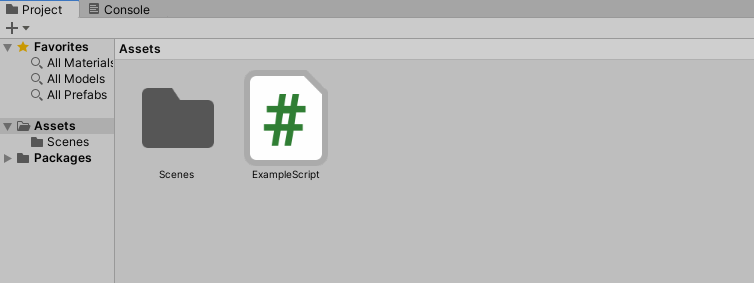
Lists all Assets you created. Assets allow you to create and store reusable:
- Scenes
- Objects
- Materials
- Scripts
- Animations
- much more or a combination of the above
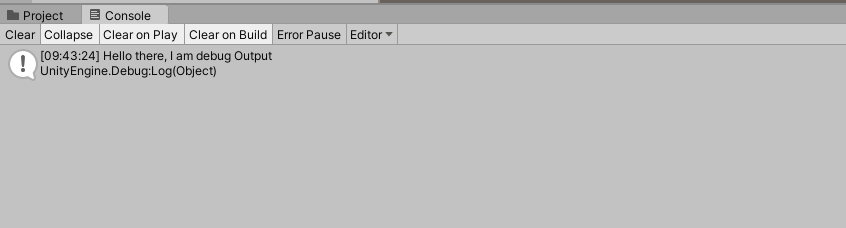
Console
Displays any kind of warning, error or debug message your Scripts might produce.
A simple example would be:
- Go to the
Project-Pane - Create an Asset called C#-Script with Rightclick
- Rename it to
ExampleScriptand doubleclick it to open the Default Editor - Add the line
Debug.Log("Hello there, I am debug Output");in the Start()-block of the existing code. Things should look like this
using System.Collections;
using System.Collections.Generic;
using UnityEngine;

public class ExampleScript : MonoBehaviour
{
    // Start is called before the first frame update
    void Start()
    {
        Debug.Log("Hello there, I am debug Output");
    }
}
Save the file
- Go back to Unity, Drag the Script from the Asset Pane into the Inspector Pane of any object
- Switch to the Console Pane
- Run the Game using the Play Button.
You now should see your message in the Console:
03. Prefabs & Assets
A Prefab is a bit like a prototype/template of a GameObject, which includes all Components, Materials, Animations and Settings. To create a Prefab from an existing GameObject just drag the object from the Hierarchy Window into the Project/Assets Window.
Whenever you want to reuse a single object all over your Scene, it makes sense to turn it into a Prefab, as you can then edit all Instances of the Prefab in one place.
You can additionally:
- put Prefabs into other Prefabs, see nesting Prefabs
- override certain aspects of single Instances, see here
- create variants of Prefabs, see here
- create Instances at runtime, see here
Editing Prefabs
You can edit a Prefab by entering Prefab Mode via:
- Doubleclicking it in the Assets Pane
- Using the Arrow-Button (>) in the Hierarchy window
- Click the Open Button in the Inspector window
You can then exit the Prefab Mode via:
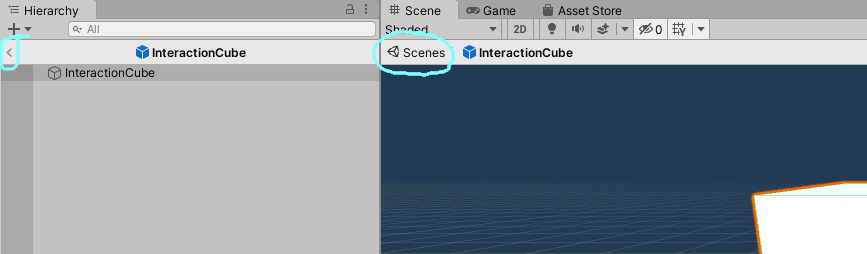
- Back-Arrow in the Hierarchy window
- Click on "Scenes" in the Breadcrumb-bar on Top of the Scene viewer
Instance Overrides
If you create a Prefab and place it multiple times within your scene, all the settings in every single Instance you placed will be identical – sometimes however you want to adjust single instances a bit to get some variation – this is where Instance Overrides come into play.
Here is what Instance Overrides are allowed to actually override:
| Ok? | What |
|---|---|
| ✘ | reparent a part of the Prefab |
| ✘ | remove GameObjects that are part of the Prefab (you could deactivate them however) |
| ✔ | Changing the value of a property |
| ✔ | Adding a component (e.g. a Script) |
| ✔ | Removing a component |
| ✔ | Adding a child GameObject |
Changed Properties will be marked blue and written in bold in the Inspector:
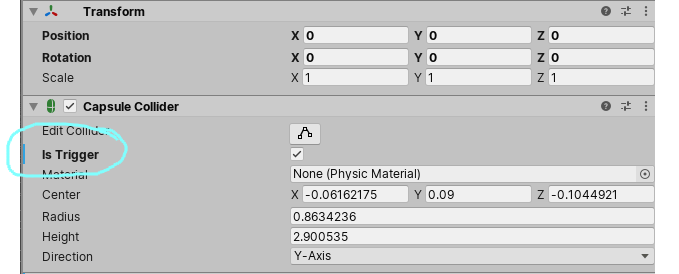
Note: If you want to apply the changes made in an Override to all other Prefabs, you can select Apply from the Overrides Dropdown menu in the top right of the Inspector window. If you want to get rid of the changes select Revert.
Nested Prefab
Prefabs can contain other Prefabs. This is called nesting Prefabs. If you put Prefabs inside a Prefab, the Prefabs will retain their links to their own assets. This is useful if you e.g. have a Prefab of a table and you want to create a reusable Prefab with table, chairs, a vase and so on – this way you could quickly place the whole Table with chairs, vase etc multiple times within your scene without having to manually moving around each chair or vase. If you still would like to make changes to individual table-sets you can of course use Instance Overrides
To create a nested Prefab:
- Go into Prefab Mode (doubleclick it in the Project or Hieararchy window)
- Drag in any Prefab like you'd do normally
Prefab Variants
If creating Instance Overrides is getting old, you can also use Prefab Variants.
To create a Prefab Variant, simply:
- Rightclick a Prefab in the Project view and select
Create > Prefab Variant - Open Prefab Mode for the newly created Variant and modify it with overrides
Unpacking Prefab instances
If you want to convert your Prefab Instance into a regular GameObject, you can unpack it. This is basically the reverse of creating a Prefab and bakes everything you did with that single instace into a Gameobject. After you unpacked a Prefab any modification you might make in the Prefab no longer affect the unpacked Gameobject.
You can unpack a prefab in the Hierarchy view using:
Rightclick on the Prefab Instance and then selecting Unpack Prefab Completely
Instantiating Prefabs at runtime
The template-nature of prefabs makes them incredibly useful for anything that needs to create things at run time. This could mean creating Super-Mario-like monsters or bullets, or basically anything that you want to create much of.
Using Prefabs for this is useful because:
- it is easier in code than creating a GameObject from scratch
- changes to the Prefab are easier
- you can change the Prefab without changing the code and get different results
This is commonly used to:
- Create structures by code (e.g. levels)
- Projectiles and explosions
- swap out characters with ragdolls etc
To create a prefab at runtime your code needs to reference the Prefab in code. This reference will show up in the Inspector as an assignable field, so you can quickly change what Prefab you want to use.
A code that creates a new instance of your selected Prefab at a given position:
using UnityEngine;
public class InstantiationExample : MonoBehaviour
{
    // Reference to the Prefab. Drag a Prefab into this field in the Inspector.
    public GameObject myPrefab;

    // This script will simply instantiate the Prefab when the game starts.
    void Start()
    {
        // Instantiate at position (0, 0, 0) and zero rotation.
        Instantiate(myPrefab, new Vector3(0, 0, 0), Quaternion.identity);
    }
}
If you want to create Prefabs on the fly using a Trigger Volume (see BindToTrigger-Script) or via Interaction (see Interactable-Script), you might have to change:
void Start()
into
public void CreateMyObject()
and select that method in the BindToTrigger and Interactable Components you placed onto your objects. So instead of creating a new Instance of the Prefab on Start, you can this way manually trigger when a new Instance should be created.
If you e.g. want to create a new Prefab every 1 second while someone is within a Trigger-Volume, you could use something like this (untested, but should work):
using UnityEngine;

public class CreateRepeatedly : MonoBehaviour
{
    // Reference to the Prefab. Drag a Prefab into this field in the Inspector.
    public GameObject myPrefab;

   public float delay = 0.0f;
   public float interval = 1.0f;

    void OnTriggerEnter() {
        // Run the CreateMyObject function repeadly every n seconds (where n is the value stored in interval)
        // start doing this after a delay of m seconds (where m is  the value stored in delay)
        InvokeRepeating("CreateMyObject", delay, interval);
    }

    void OnTriggerExit() {
        // Stop repeating when the trigger is beeing exited
        CancelInvoke("CreateMyObject");
    }

    public void CreateMyObject() {
        // Create a object at this fixed position
        Instantiate(myPrefab, new Vector3(0, 0, 0), Quaternion.identity);
    }
}
For a more detailed overview have a look at the unity documentation
04. Modelling
Modelling describes the process of creating the geometry used by a game engine or 3D-software. A 3D-model is a numerical description of the geometry – this means Modelling is about form and shape of objects.
Unity has only basic modelling capabilities. This is an overview of the different methods you can use to get geometry in:
| Tool | Capabilities | Complexity/Challenges |
|---|---|---|
| Unity (w/o Addons) | Only Basic shapes like Cuboids, Spheres, Cylinders; Some special things like Terrain | Low |
| ProBuilder Addon | More complex shapes and texture mapping possible, organic shapes, sculpting and animations hard | Medium |
| External Tools | Depends on the Tool, but potentially Everything | High |
In the gaming industry mostly external modelling tools like Blender, Modo, ZBrush, Rhino, Sketchup, AutoCAD, Cinema4D, Maya, 3DsMax, etc. are used, the ProBuilder-Addon is used mostly for Greyboxing (Greyboxing is drafting a Level with basic blocks, just to get something that plays well before adding more Detail). Which tool you use doesn't matter, as long as it gets you the result you want to get. As long as your tool can export a fbx, obj or glb (GLTF) you are good to go. If your 3D-Software can't export that format, maybe you can take intermediate step (e.g. if you use a CAD software that can only export STEP files, you could use Blender to convert to obj, fbx or gltf).
If you don't know any 3D-Software yet, but want to learn one I'd recommend Blender – it is free, open source, runs on nearly every computer, is under active developement, has a big and friendly community, a ton of tutorials and it is no worse than any commercial competitor for >2k€.
If you don't want to learn a new Software, good ways of getting decent results are if you use free models you find online (be aware of possible license issues tho) or 3D-scan your own objects.
ProGrids & ProBuilder
If you want to power up Unity's internal editing capabilities it makes sense to install both the ProGrids and the ProBuilder Addons. Unity seems to plan to add these per default in the new 2020-Version of Unity, but at the point of writing you still need to install it yourself.
Installation in Unity (may be unnecessary in Unity 2020):
- Open the Package Manager:
Window > Package Manager - Make sure the option
Advanced > Show preview packagesis active - Search for _ProGrids" and click the
Install</kbd>-Button - Search for _ProBuilder" and click the
Install</kbd>-Button - Activate ProGrids using
Tools > ProGrids > ProGrids Window, you should see a new panel in the Scene view and the Grid should change color - Activate ProBuilder using
Tools > ProBuilder > ProBuilder Window, drag the Window somewhere useful, press the ⋮-Button in the window and selectUse Icon Modeif you like
The ProGrids-Module allows you to snap objects to the grid (make sure the switch is set to On). Adjust the grid scale with a click on the number or using the + and --Keys on your keyboard.
The ProBuilder-Module adds many new capabilities. If you want to learn it, this videotutorial is a good starting point, but youtube is full of tutorials on it : )
Blender import Workflow
If you want to import models from Blender there are multiple things to consider:
- If you use Curves/Metaballs/Text or similar non-mesh objects, you will have to convert them to a mesh first (Rightclick
> Convert to Mesh) - If you use Modifiers (e.g. Subdivision surface, Solidify, etc.) you need yo click Apply first
- If your mesh is really detailed it could slow down Unity (just test this). If this happens, consider using a normal Map: see here
- If you use procedural Textures you will have to bake the textures first, see here
There are multiple possible transfer formats that allow you to move models from Blender to unity:
| Format | How | Pro | Con |
|---|---|---|---|
Blender .blend |
Simply drag the .blend files into the Unity Assets window |
Very straightforward and easy | Will import the whole Blender scene, No Materials, Animations etc |
.obj and .mtl |
Drag both into the Unity Assets window | Universal and easy | Limited support for Textures, Shaders and Animations |
.fbx |
Drag into the Unity Assets window | Old and trusted for transfering stuff, works well with Animations | Limited Shader support |
GLTF: .glb |
Install GLTFUtility | Allows you to use everything from the principled BSDF-Shader (like Roughness, Metallic etc), Works with animations, Preserves Hierarchy and object names | Doesn't work without Addon |
To install the GLTFUtility open the Window > Package Manager, click on the +-Button and add the git-Url that you can find in the readme here: https://github.com/siccity/gltfutility.git
05. Oculus VR Setup
Oculus VR Setup
To get started with Unity and the Oculus Quest glasses quite a few things have to line up. As of July 2022 the way described here worked.
Attention: Changes
Both the Unity Editor and the Oculus Software are constantly changing. This means, by the time you read this guide, it might be outdated already (it has been written in July 2022). If you are in doubt please also check the official oculus developer guide.
Download and install the Unity Hub
There are many versions of the Unity Editor. To make it easier to manage your projects and the different versions of the editor software you can use a software called the Unity Hub
For this you need to go to the unity3d-website and click on Download Unity Hub
Then you install the software (how this works depends on your operating system).
Unity Account
Unity has a license model where they allow you to use the Game-Engine for projects going up to a certain revenue (e.g. if you earn below 10k€, but make sure to check yourself). In an art school this is typically not an issue. They still want you to create an account for it, so go ahead and create one
Install the Editor
The installation is pretty self-explainatory, except for one step where you have to select the modules that are needed for a Oculus-build. So follow along:
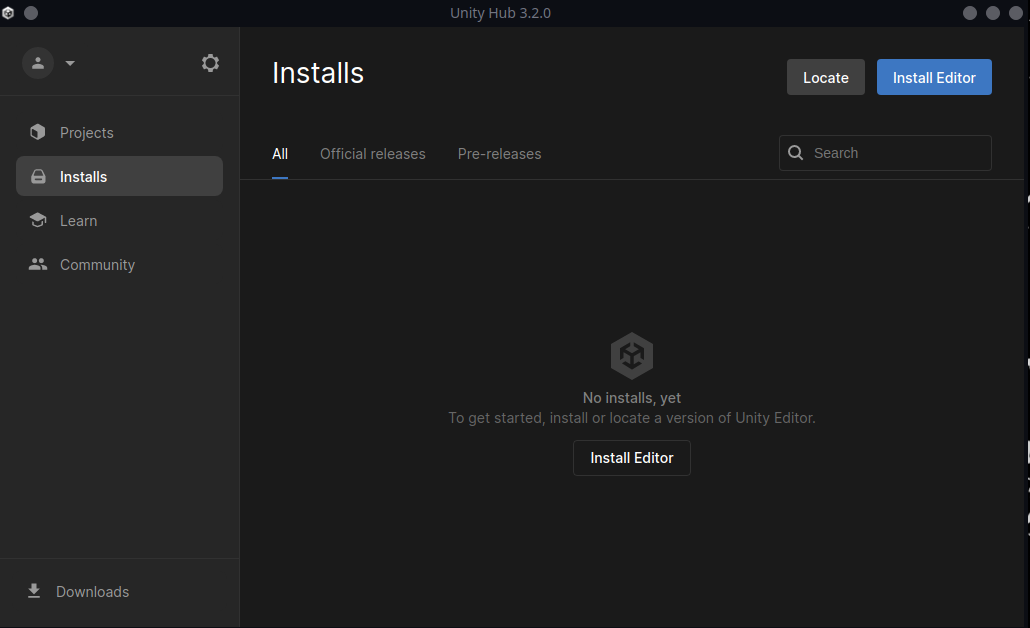
- Start the Unity Hub Software
- Go to the Tab Installs and Click on Install Editor:
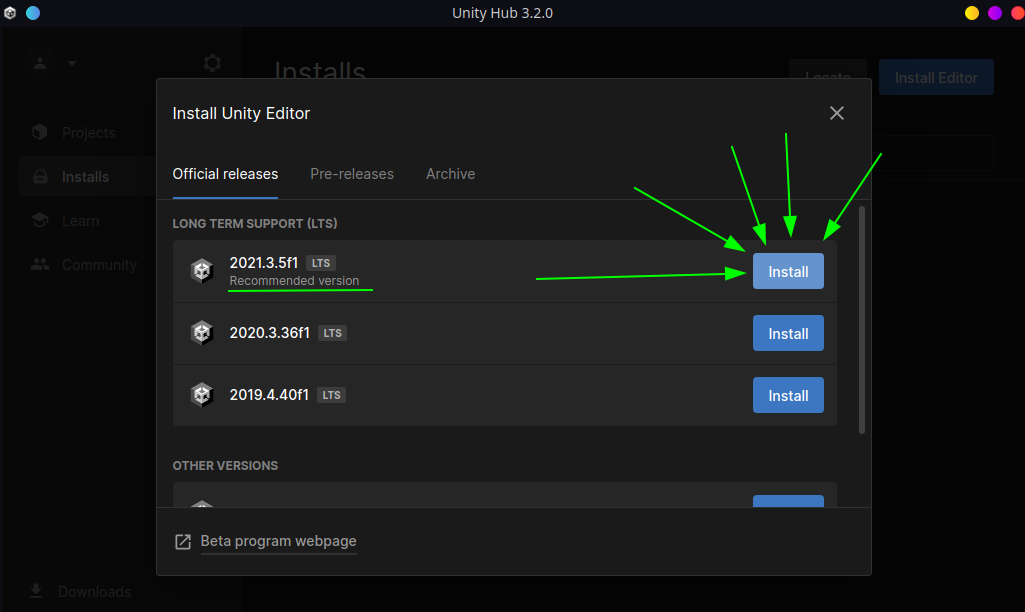
- Now you need to tell the Unity Hub which version of the Editor you want. You can install multiple different versions and select them when creating a project. Unless anything else is mentioned in the instructions go for the Recommended version with Long Term Support (LTS):
- Now you need to select the Modules you want to have in this installation of the Unity editor. This means for example for which Operating System you can export ("build") your Game. The Oculus Quest uses Android as an Operating System, so you need to select all the Android stuff. You can also Select Linux, Mac and Windows if you want to run your game on these operating systems or WebGL if you want to run it on the Web:
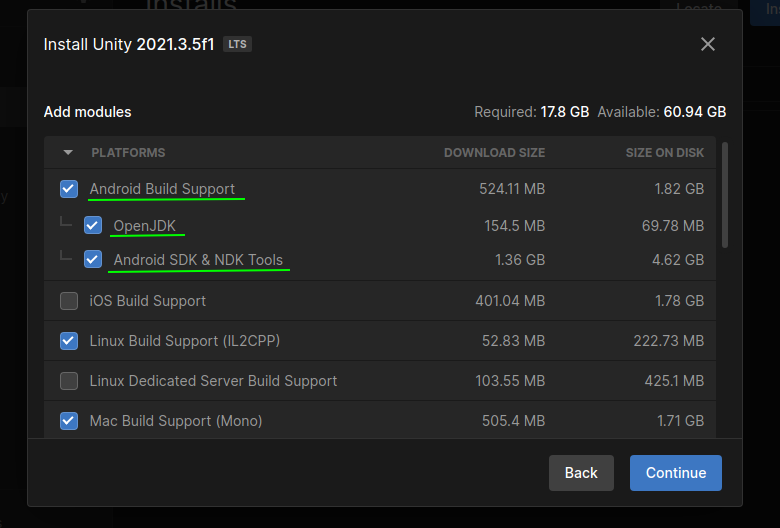
- Click on Continue and Agree to the terms and conditions in the next step
- Now the Editor will be downloaded, which might take a bit
Note: If you forgot to install any dependencies you can add them later by right clicking the editor and clicking on Add Module
Factory reset the Oculus Quest
Note: you can skip this if the Oculus already works for you
The VR glasses might have been used by someone else before. Before you operate them (or before you give them back if you made a lot of changes) it makes sense to factory reset them:
- Press and hold Volume - + Power on the Oculus for at least two seconds till a brightly colored Text appears
- In the menu select
Factory Resetwith the Volume - and Volume + buttons, then commit the selection with Power - Confirm the Factory reset in the next step by selecting
Yes, erase and factory resetand pressing Power again
Update Glasses
Note: you can skip this if the Oculus already works for you
If the glasses already have a account on them or you had them lying around for a while it makes sense to check for updates once in a while. In the glasses go to:
Settings > About/Info > Update
Set the Oculus Quest to Developer Mode
In order to be able to install your own Games onto the Oculus Quest you need to activate Developer Mode (if it has not been activated already).
For this you need to do both of those things:
- put the Oculus Quest onto your head and go to
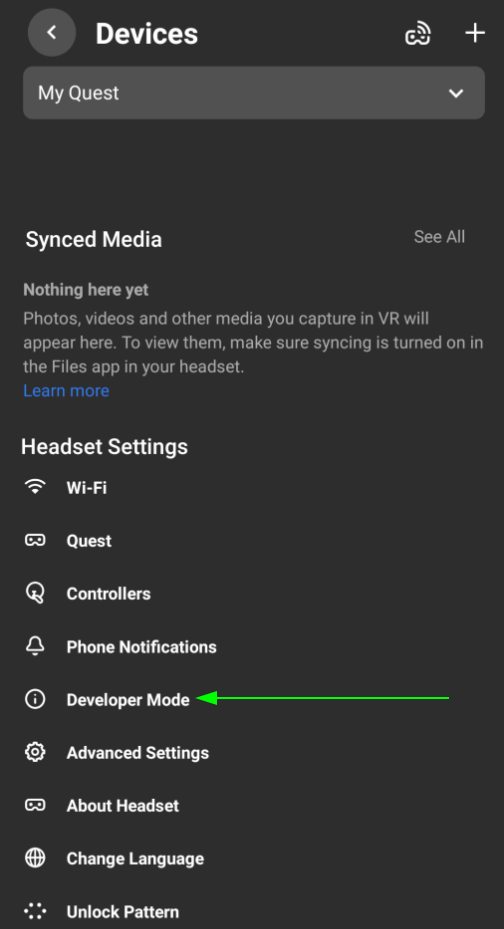
Settings > System > Developerin the menu and turn on the USB Connection Dialog option - activate the Developer Mode from the Oculus App on your phone (if the glasses don't have developer mode activated by someone else already):
- Install the Oculus App on your Smartphone
- Activate Bluetooth on your phone (used for discovery of the Oculus)
- Start the app and allow location while using the app (Note: if you deny this, the app will not find the Oculus later)
- Go to Devices and click on +, select "Ouest" and follow the instructions
- Once the device is set up, activate Developer Mode:
Setting up a project
First you need to connect the glasses to your computer
- Connect the Oculus Quest glasses with an USB-C Cable to your Computer (if your Computer does not have USB-C you can use an USB-A to USB-C Adapter)
- Put the Oculus Quest on your head: If it asks you if you allow that connection. Click Allow, same goes for Data connections
Setting up an Unity Project
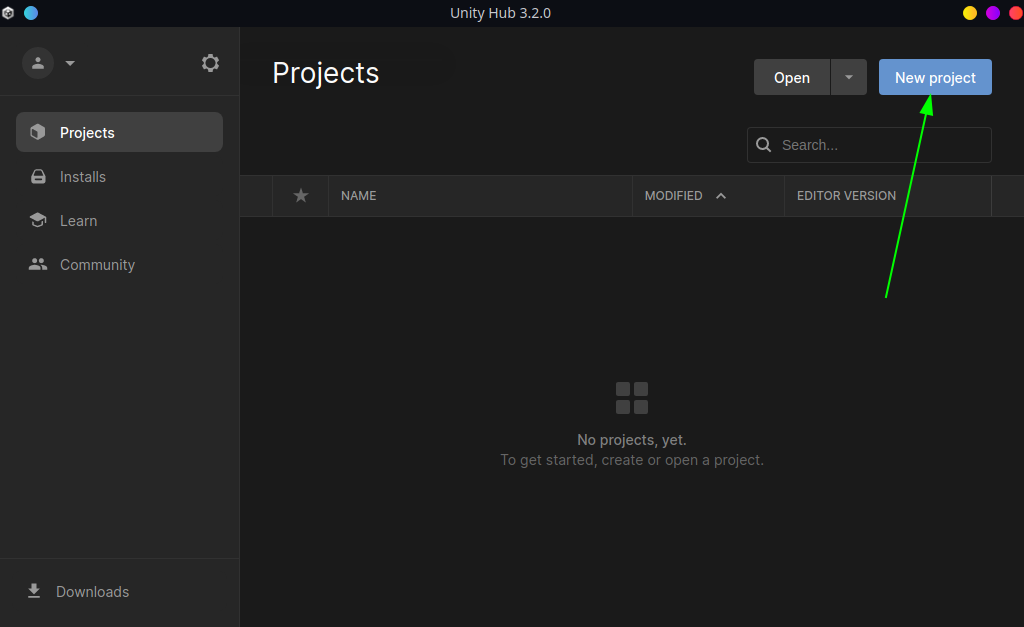
- in the Unity Hub Software go to the Projects Tab and click on New Project:
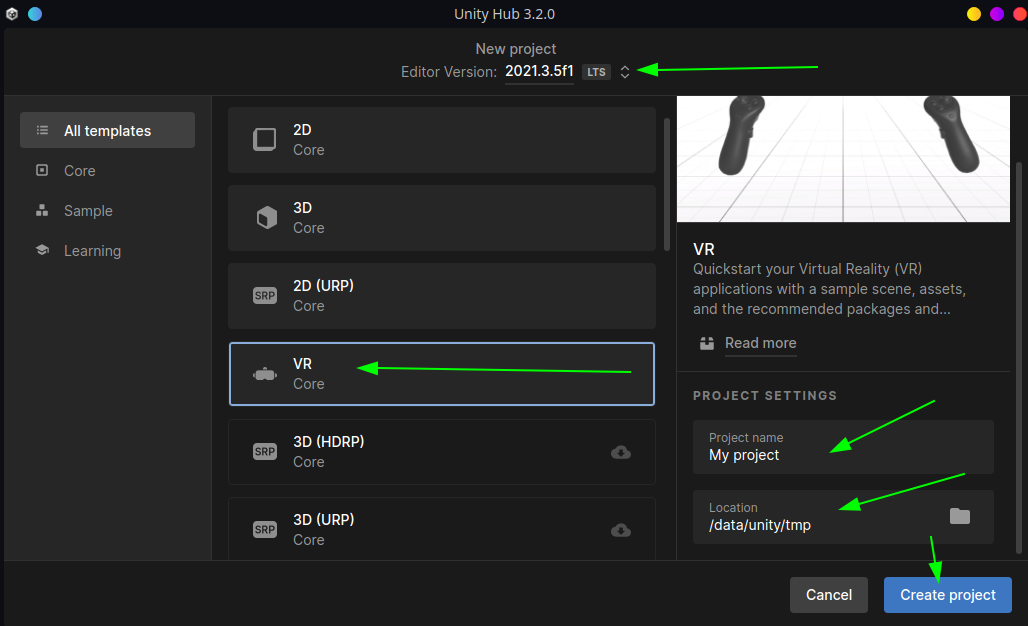
- In the next window, make sure the right editor version is selected. Select and download the VR Template (if necessary), name your project (Note: this is the name of the app on the glasses), select a Location for the stored data and finally click on Create project:
- The editor opens and tells you to change some Project settings:
Go to
Edit > Project Settings > XR Plug-in Managmentclick on the Small Android Icon and activate Oculus (If this looks different for you, you may have to click the Install XR Plug-In Managmentkbd>-Button):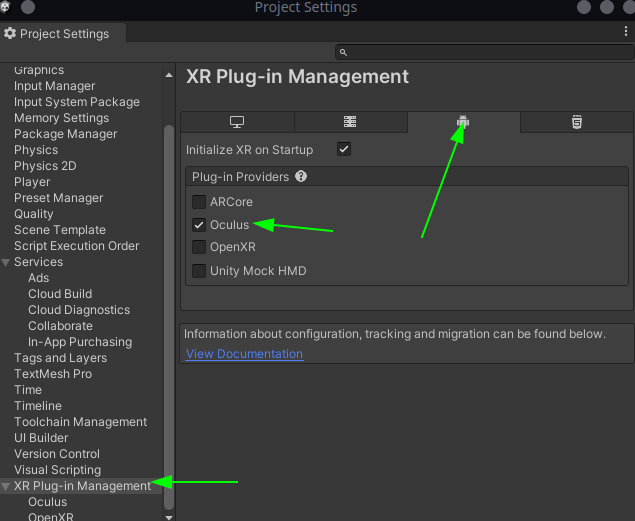
- Go to
File > Build Settings(On a Mac this might beUnity > Build Settings). Click on the Android Tab and then click the Switch Platform button: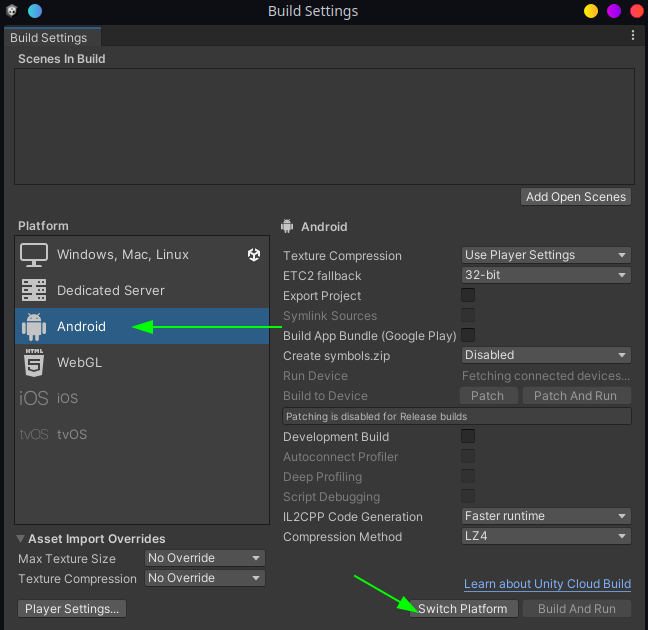 \
Please Note: This is also where you select the Scenes that will be exported (see the Scenes in Build-Section on top)
\
Please Note: This is also where you select the Scenes that will be exported (see the Scenes in Build-Section on top)
Build the Unity project
If you were to click the Build-button now, the Scenes in Build would get built ("converted") into a Android Package (a file ending with .apk) which can then be transfered to the Oculus (e.g. using the adb ("Android Debug Bridge") command line program) and run as an interactive application or game. This means this apk contains all the scenes you included in the Build settings.
If you want a more seamless development experience you can connect the Oculus to Unity:
- Connect the Oculus to your computer using a working USB-cable
- Switch the Oculus on
- Allow the connection from within the glasses
- in Unity go to
File > Build Settingsthen to the Android Tab - Click Refresh where it says Run Device and select the Oculus Quest from the Drop-Down Menu (saying "Default device"):
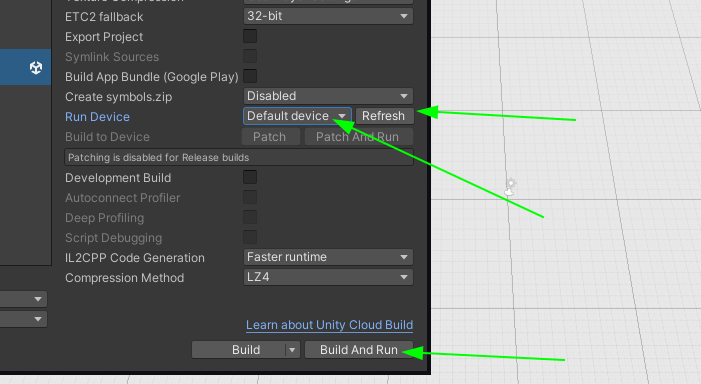
- When you now click Build And Run your game will compile, be transfered to the glasses via USB and should start automatically!
The first compilation will take a long time (10 mins on my machine), so be prepared for a wait. But no worries the compilations after this initial one will be much faster.
If it does not work: The Build and Run-button runs the adb-command line tool in the background. If any other program (e.g. the Oculus Developer Portal) uses adb at the same time, Unity might not find your device. Sometimes it also helps to disconnect and reconnect the cable. If your Oculus is not in Developer mode this will also not work (see instructions above).
Additional Note: If you run a Windows machine you might also consider using Oculus Link and a fast USB-C-cable. This allows you to click the play button in the Unity editor and directly see what is going on which is a lot faster. The cable needed for this is however a fast 4K-ready USB-C cable (the included charging cable does not work for this).
How to proceed?
There is a ton of info online already. It might make sense to follow some tutorials. Feel also free to read the follow-up articles on this site.
99. Unity & Arduino Interaction
A interesting way to use Unity is to make it interact with physical Hardware. This could of course mean existing solutions like:
- a Computer-Mouse
- a Keyboard
- Gamepads, Joysticks and such
- Midi-Controllers
- Webcams
Hacking together something from these things can already get you very far, but sometimes this might not be enough – e.g. if you want to control physical things from within Unity. If this is the case, using a microcontroller like a Arduino, Teensy, ESP32 (for wireless) or similar might be a good approach.
Any physical interaction can be seen as either Input or Output. Sensors, Buttons, Dials, Sliders, Encoders, Switches, Microphones, etc could become Inputs, while Relais, Transistors, Servos, LEDs Motors, Buzzers, Screens, etc could become Outputs.
Serial Communication
This means we have to have some way to send messages from Arduino to Unity and vice versa. The way this is usually done is so called Serial Communication. Serial means, the messages are sent one after another (As opposed to say in parallel). What is being sent is usually just ASCII-Text.

This means for example that we could periodically get sensor data from the Arduino to control stuff inside Unity, while simultaneously having our Arduino react to messages that are sent from Unity. The messages Unity receives can be used to control stuff in your scene (e.g. you could use a light sensor to change the light inside the scene). The messages Arduino receives can be used to switch on/off things, control motors, blink LEDs, show stuff on tiny displays etc.
Physical interfacing is quite intersting from an art perspective, because it allows you to influence as which medial dispositif the viewers will perceive themselves: is it passive television watching, listening to a radio or a record, is it a computer game, a arcarde game or rather just magic?
Setup and Test Arduino Software
- Install the Arduino IDE
- Connect your Arduino to Computer via USB-Cable to your computer
- Check if the Arduino works with the blink example:
- Open
File > Examples > 01.Basics > Blink - Try to flash it onto the Arduino using the round Arrow button
- If it doesn't work, you probably need to change the Arduino Model or the COM-Port. If you use cheap Arduino Nanos from China, you might also have to set
Tools > Processor [...]toAtmega 328P (Old Bootloader)
- Open
- Copy the code below into the Arduino Editor and flash it onto the Arduino
// A variable to keep track of the last time
unsigned long last_time = 0;

void setup() {
    // Set the built in LED pin to Output Mode
    pinMode(LED_BUILTIN, OUTPUT);

    // Start serial communication with a BAUD-Rate of 9600
    Serial.begin(9600);
}

void loop() {
    // Print a heartbeat every 2000 seconds (by comparing if 2000ms
    // have passed since the value stored in the last_time variable)
    if (millis() > last_time + 2000)
    {
        // Send a message to Unity. If you want to use this message
        // to control things you will have to change the Unity Script
        // (e.g. SerialController.cs) If you are reading out a sensor
        // and want Unity to react to it, consider sending a message from
        // Unity and sending your data in a response instead
        Serial.println("Arduino is alive!!");

        // Store the current time in the variable
        last_time = millis();
    }

    // Send some message when the given letter is received
    switch (Serial.read())
    {
        case 'A':
            // Send a response to Unity
            Serial.println("Arduino received letter A: switch on LED.");
            // Switch the LED
            digitalWrite(LED_BUILTIN, HIGH);
            break;
        case 'Z':
            // Send a response to Unity
            Serial.println("Arduino received letter Z: switch off LED.");
            // Switch the LED
            digitalWrite(LED_BUILTIN, LOW);
            break;
    }
}
Setup Unity
Install the Ardity Addon from the
Asset-StoreMake sure that the Option
API Compability LayerunderEdit > Project Settings... > Player > Other Settingsis not set to.NET Standard 2.0. At the point of writing the correct Option was.NET 4.xbut this could change with new versions of Unity:

In your Project Window check out Assets > Ardity > Scenes to see how the thing is set up. You could use the Prefabs in Assets > Ardity > Prefabs to allow your Unity Scene to interact with one or more Arduino/Teensy/etc via USB connection. A very similar approach would potentially also work wireless with a ESP32.
PLEASE NOTE: make sure that the Object with the Serial Controller-Script on it (e.g. the Serial Controller-Prefab) has the right Port Name selected. If you are unsure where to get this value, it is the one listed in the Arduino Editor under Tools > Port ...
These Ports are named as follows (replace * with a number):
- Windows:
COM* - MacOS/Linux:
/dev/tty*
Example Project
If you are curious how to achieve bidirectional communication between Arduino and Unity have a look at this Example Scene