05. Oculus VR Setup
Oculus VR Setup
To get started with Unity and the Oculus Quest glasses quite a few things have to line up. As of July 2022 the way described here worked.
Attention: Changes
Both the Unity Editor and the Oculus Software are constantly changing. This means, by the time you read this guide, it might be outdated already (it has been written in July 2022). If you are in doubt please also check the official oculus developer guide.
Download and install the Unity Hub
There are many versions of the Unity Editor. To make it easier to manage your projects and the different versions of the editor software you can use a software called the Unity Hub
For this you need to go to the unity3d-website and click on Download Unity Hub
Then you install the software (how this works depends on your operating system).
Unity Account
Unity has a license model where they allow you to use the Game-Engine for projects going up to a certain revenue (e.g. if you earn below 10k€, but make sure to check yourself). In an art school this is typically not an issue. They still want you to create an account for it, so go ahead and create one
Install the Editor
The installation is pretty self-explainatory, except for one step where you have to select the modules that are needed for a Oculus-build. So follow along:
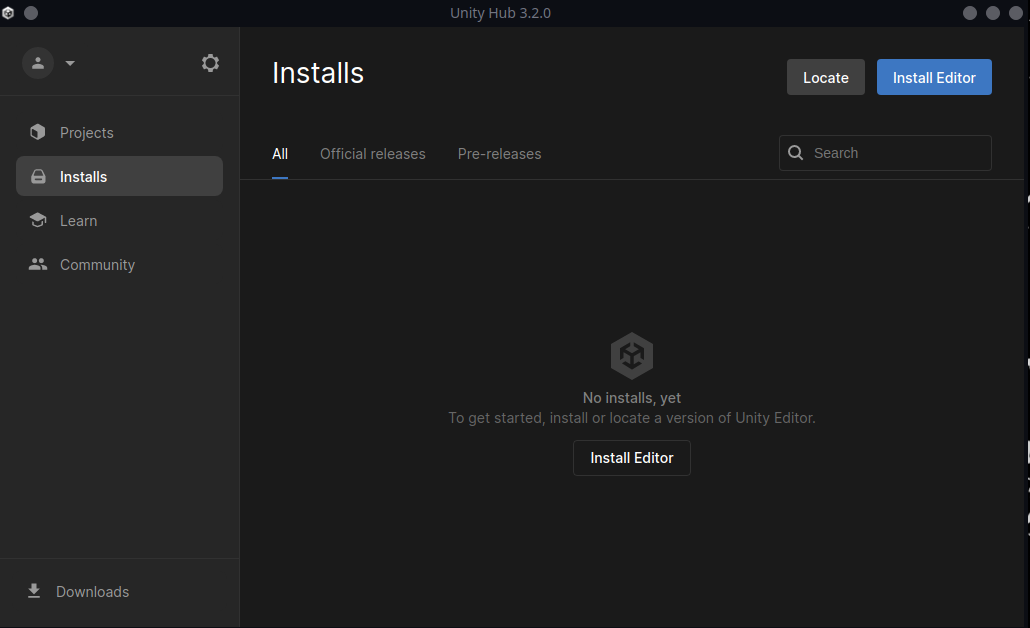
- Start the Unity Hub Software
- Go to the Tab Installs and Click on Install Editor:
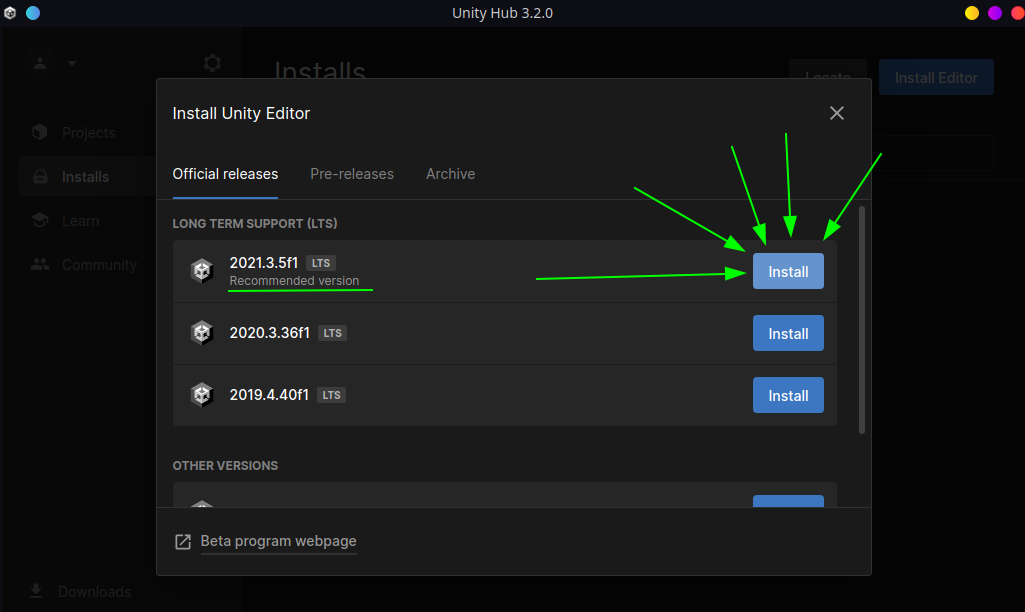
- Now you need to tell the Unity Hub which version of the Editor you want. You can install multiple different versions and select them when creating a project. Unless anything else is mentioned in the instructions go for the Recommended version with Long Term Support (LTS):
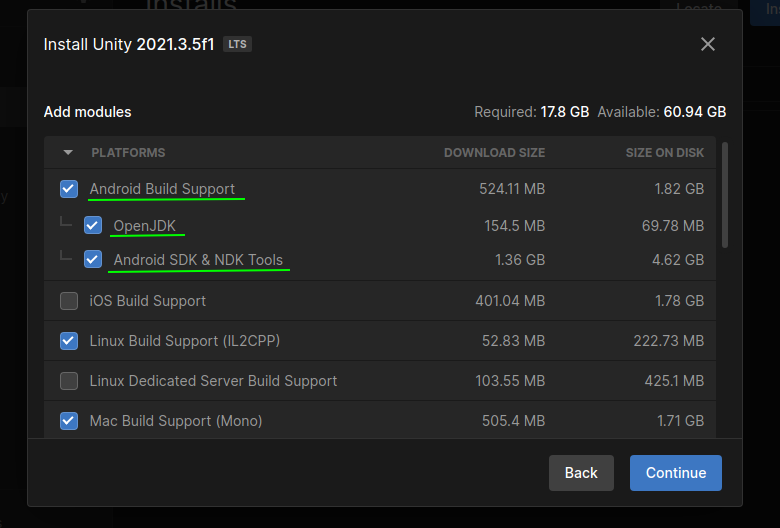
- Now you need to select the Modules you want to have in this installation of the Unity editor. This means for example for which Operating System you can export ("build") your Game. The Oculus Quest uses Android as an Operating System, so you need to select all the Android stuff. You can also Select Linux, Mac and Windows if you want to run your game on these operating systems or WebGL if you want to run it on the Web:
- Click on Continue and Agree to the terms and conditions in the next step
- Now the Editor will be downloaded, which might take a bit
Note: If you forgot to install any dependencies you can add them later by right clicking the editor and clicking on Add Module
Factory reset the Oculus Quest
Note: you can skip this if the Oculus already works for you
The VR glasses might have been used by someone else before. Before you operate them (or before you give them back if you made a lot of changes) it makes sense to factory reset them:
- Press and hold Volume - + Power on the Oculus for at least two seconds till a brightly colored Text appears
- In the menu select
Factory Resetwith the Volume - and Volume + buttons, then commit the selection with Power - Confirm the Factory reset in the next step by selecting
Yes, erase and factory resetand pressing Power again
Update Glasses
Note: you can skip this if the Oculus already works for you
If the glasses already have a account on them or you had them lying around for a while it makes sense to check for updates once in a while. In the glasses go to:
Settings > About/Info > Update
Set the Oculus Quest to Developer Mode
In order to be able to install your own Games onto the Oculus Quest you need to activate Developer Mode (if it has not been activated already).
For this you need to do both of those things:
- put the Oculus Quest onto your head and go to
Settings > System > Developerin the menu and turn on the USB Connection Dialog option - activate the Developer Mode from the Oculus App on your phone (if the glasses don't have developer mode activated by someone else already):
- Install the Oculus App on your Smartphone
- Activate Bluetooth on your phone (used for discovery of the Oculus)
- Start the app and allow location while using the app (Note: if you deny this, the app will not find the Oculus later)
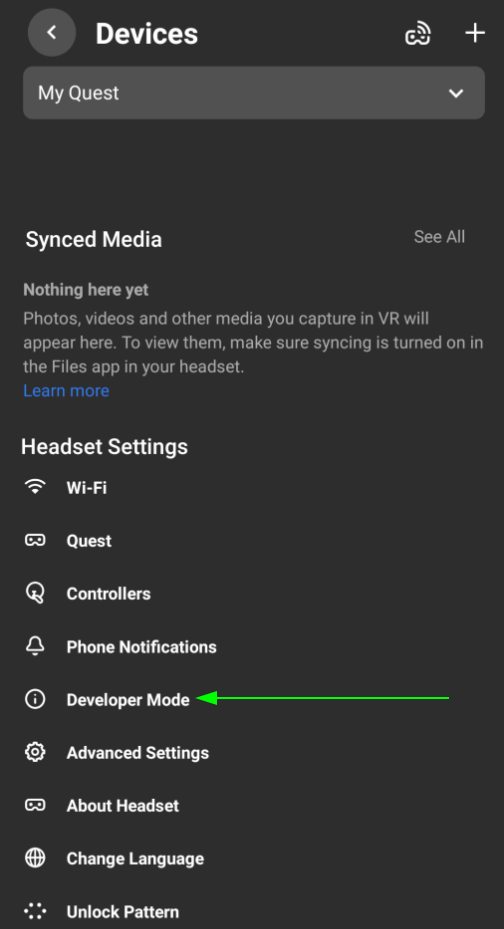
- Go to Devices and click on +, select "Ouest" and follow the instructions
- Once the device is set up, activate Developer Mode:
Setting up a project
First you need to connect the glasses to your computer
- Connect the Oculus Quest glasses with an USB-C Cable to your Computer (if your Computer does not have USB-C you can use an USB-A to USB-C Adapter)
- Put the Oculus Quest on your head: If it asks you if you allow that connection. Click Allow, same goes for Data connections
Setting up an Unity Project
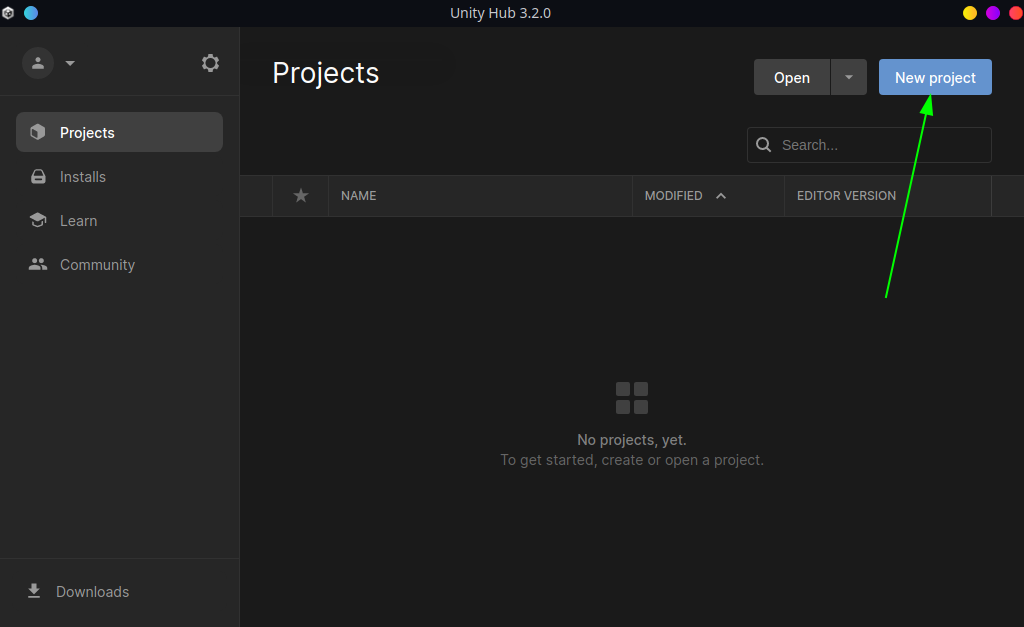
- in the Unity Hub Software go to the Projects Tab and click on New Project:
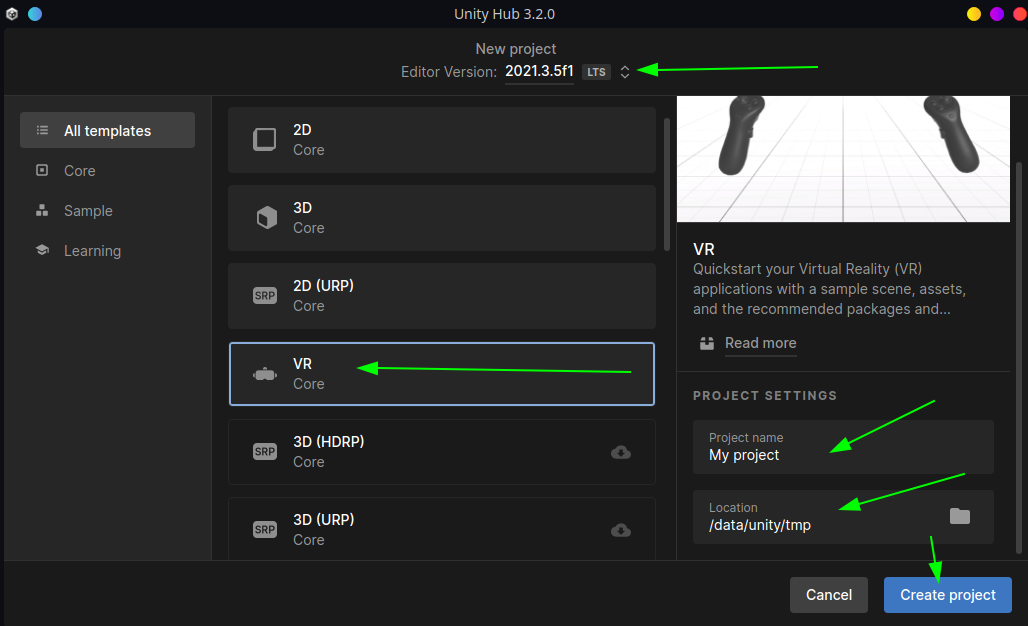
- In the next window, make sure the right editor version is selected. Select and download the VR Template (if necessary), name your project (Note: this is the name of the app on the glasses), select a Location for the stored data and finally click on Create project:
- The editor opens and tells you to change some Project settings:
Go to
Edit > Project Settings > XR Plug-in Managmentclick on the Small Android Icon and activate Oculus (If this looks different for you, you may have to click the Install XR Plug-In Managmentkbd>-Button):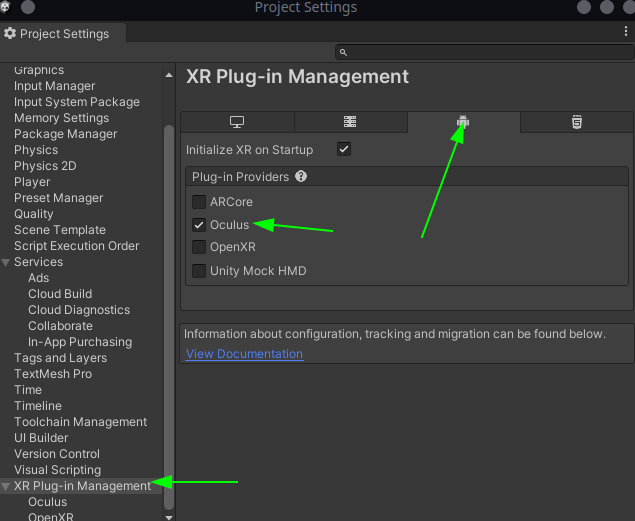
- Go to
File > Build Settings(On a Mac this might beUnity > Build Settings). Click on the Android Tab and then click the Switch Platform button: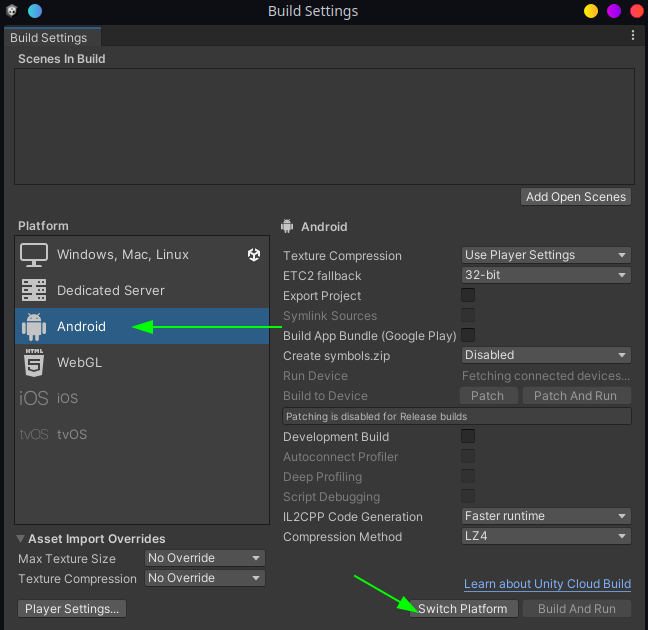 \
Please Note: This is also where you select the Scenes that will be exported (see the Scenes in Build-Section on top)
\
Please Note: This is also where you select the Scenes that will be exported (see the Scenes in Build-Section on top)
Build the Unity project
If you were to click the Build-button now, the Scenes in Build would get built ("converted") into a Android Package (a file ending with .apk) which can then be transfered to the Oculus (e.g. using the adb ("Android Debug Bridge") command line program) and run as an interactive application or game. This means this apk contains all the scenes you included in the Build settings.
If you want a more seamless development experience you can connect the Oculus to Unity:
- Connect the Oculus to your computer using a working USB-cable
- Switch the Oculus on
- Allow the connection from within the glasses
- in Unity go to
File > Build Settingsthen to the Android Tab - Click Refresh where it says Run Device and select the Oculus Quest from the Drop-Down Menu (saying "Default device"):
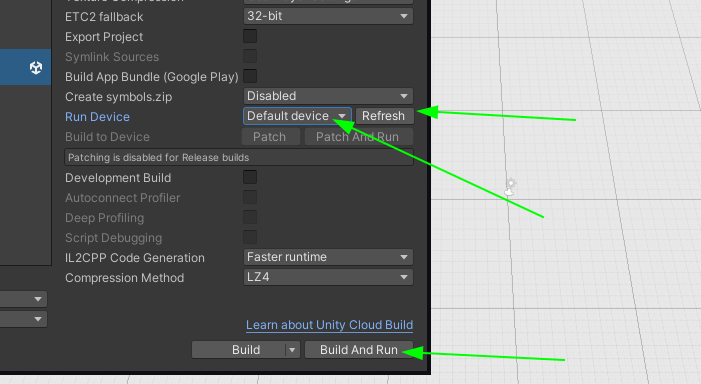
- When you now click Build And Run your game will compile, be transfered to the glasses via USB and should start automatically!
The first compilation will take a long time (10 mins on my machine), so be prepared for a wait. But no worries the compilations after this initial one will be much faster.
If it does not work: The Build and Run-button runs the adb-command line tool in the background. If any other program (e.g. the Oculus Developer Portal) uses adb at the same time, Unity might not find your device. Sometimes it also helps to disconnect and reconnect the cable. If your Oculus is not in Developer mode this will also not work (see instructions above).
Additional Note: If you run a Windows machine you might also consider using Oculus Link and a fast USB-C-cable. This allows you to click the play button in the Unity editor and directly see what is going on which is a lot faster. The cable needed for this is however a fast 4K-ready USB-C cable (the included charging cable does not work for this).
How to proceed?
There is a ton of info online already. It might make sense to follow some tutorials. Feel also free to read the follow-up articles on this site.